Category: Hair Color
Brand: No Brand (Diy Or Homemade)
Ingredients:
Where to buy Pure Henna Powder Hair Color in the USA?
If you can’t find where to buy Pure Henna Powder Hair Color near you, we can easily help you find a place where you can quickly and cheaply buy.
You can click on “check price” button and find out where to buy to buy Pure Henna Powder Hair Color.
How to find the best price on Pure Henna Powder Hair Color?
We are always ready to offer you recommendations on where to buy Pure Henna Powder Hair Color at one of the best price on Internet.
Please, feel free to follow the “check price” button to find price we chose for Pure Henna Powder Hair Color .

cynicalOcelot5
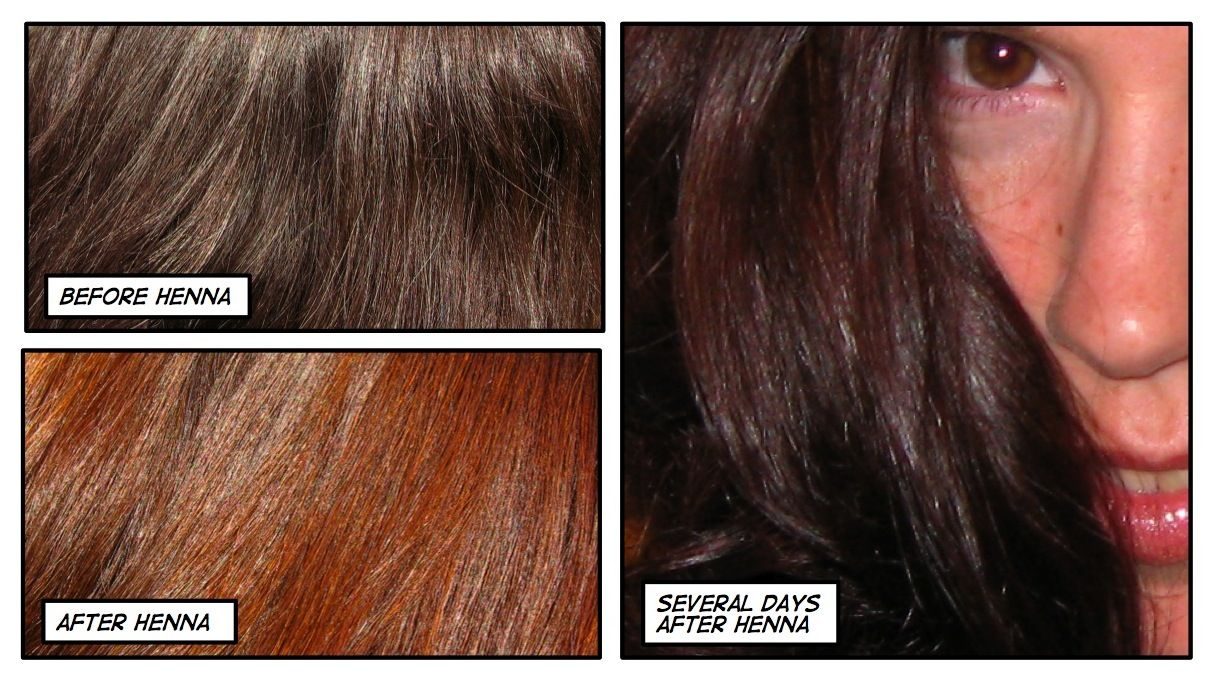
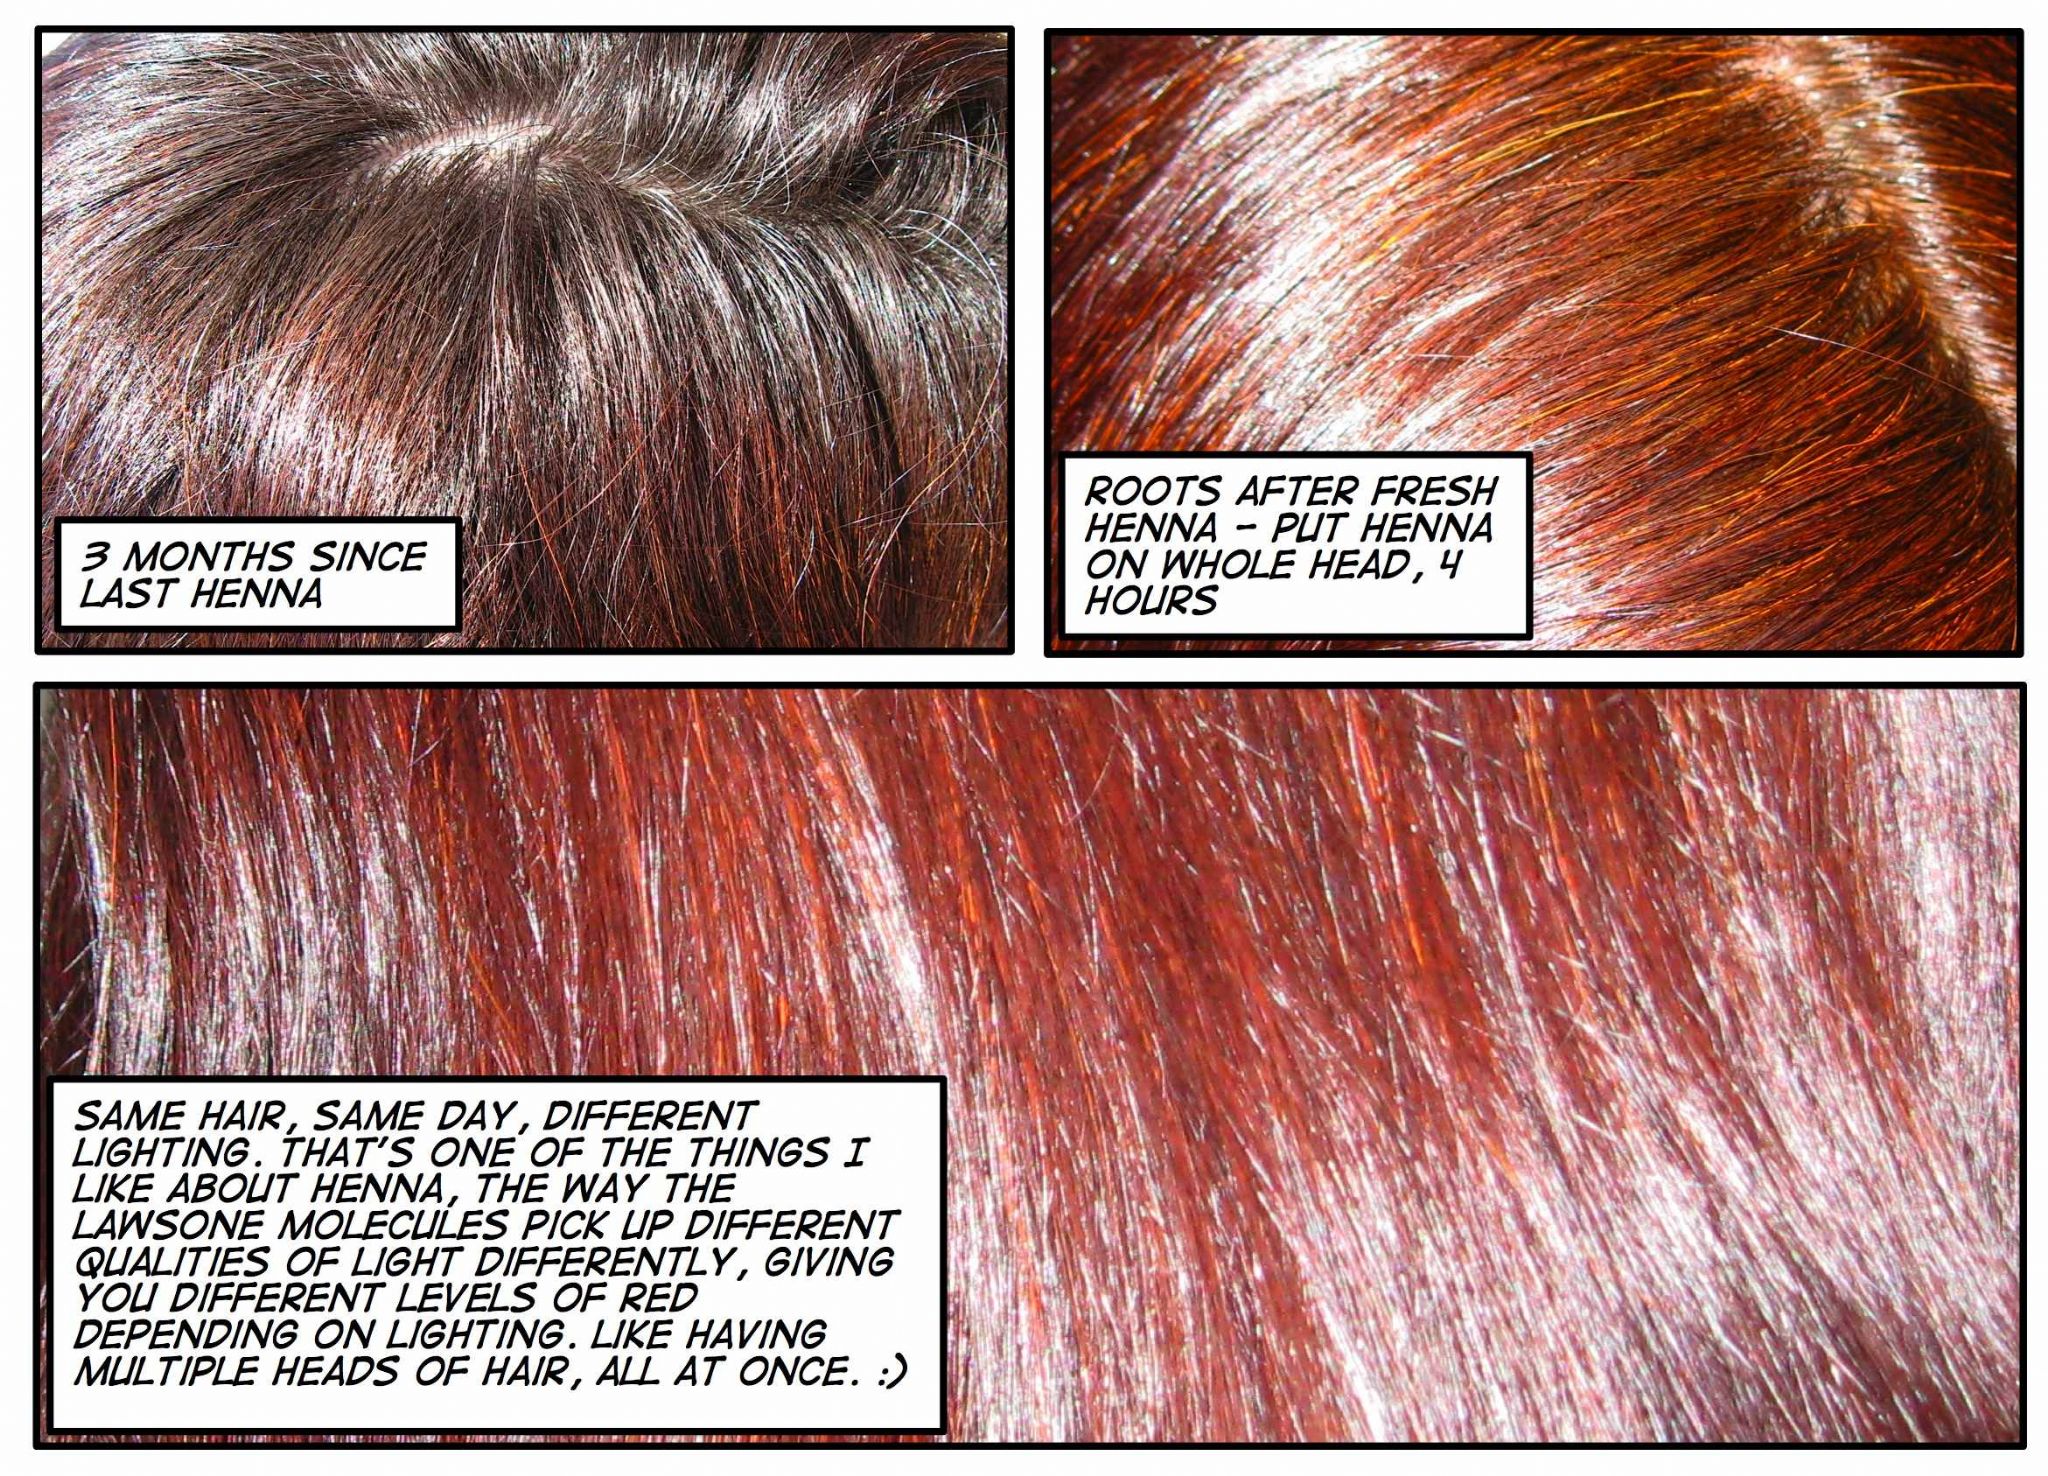
I’m older (62) and I’m about 1/3 to 1/2 grey with medium brown hair .(I had red hair as a young child) . Previously I was using commercial hair dye to cover up the grey but I didn’t like the way it dried out and damaged my hair. My Indian son-in-law suggested henna. I’ve been using henna for about 4 years now and I love the results, it makes my hair soft and shiny, covers the grey and gives my hair a beautiful multilayered auburn tinge (the grey areas are brighter red than the still brown hair).
My procedure for using it is: I mix PURE henna with water and a small amount of orange juice (acid helps the colour bloom and orange juice is gentler than lemon juice) in a stainless steel or glass bowl (it will stain plastic) and let stand for 20-30 minutes to help the colour “bloom”. I put on silicon gloves, get into the bathtub naked and rub the henna into my grey roots and apply it along my hair line. I then rub it all over my hair (sometimes I section my hair and use a brush to colour the hair underneath), then cover it with a shower cap and then a toque (beanie for you Americans) as heat helps the colour. I leave it on my head for 4 hours (this long length of time is to completely cover the grey,). (I also use a Qtip to apply it on my eyebrows). I put a red towel (set aside for this purpose) around my neck and my bathrobe and clean out the bathtub (using the shower attachment). I then relax for 4 hours. When time comes to remove the henna, I put on clean silicon gloves, get back into the bathtub, remove the caps and rinse my hair and use condition to remove the henna. I then clean the bathtub and let my hair dry naturally.
The colour will be more vivid the first day or two and then it oxidizes. I buy my henna in South Asian/Indian grocers. It is VERY IMPORTANT to buy PURE henna (NO other ingredients), NOT compound henna which contains harsh chemicals (Indian grocers sell both kinds). If you use compound henna over hair that has been chemically dyed, you will fry your hair. Pure henna only comes in red, if you want to dye your hair another colour, it isn’t for you. Indian grocers are the best and cheapest place to find pure henna. The brand I prefer is Jamilla (if I can get it, it comes from Yemen) as is a fine powder and easier to remove. The Colora brand (not sold in Indian grocers) is OK but an even muddier consistency (however you can get different colours than red, it uses all natural ingredients like indigo. However, the other colours in Colora henna will fade over time and your hair will look redder.) IMHO, LUSH henna is ridiculously overpriced, not pure henna and harder to use (you have to grate the blocks) so I’ve stayed away from it.
PROS: softens hair, does not dry out or damage hair, makes it shiny, is good for your hair ,gives light to medium brunettes a lovely autumn shade to your hair. It doesn’t fade like commercial dyes (it is a translucent coating on your hair) although over time, your roots will grow out. It has a earthy scent (much better than the ammonia in some hair dyes.) Cheaper than commercial hair dyes if you buy it in an Indian grocery store.
CONS:Very messy! Henna stains so wear gloves, have a towel, shower cap and beanie/toque set aside for this purpose. I even have a bathmat I only use for henna colouring sessions. Be prepared to clean your bathtub twice as some will end up in the tub.. Be careful around surfaces (wipe up immediately to avoid permanent stains.) If you want to cover gray, it takes a long time. It takes some time to fully rinse out and you need conditioner to assist this process. (The Colora henna brand is harder to rinse out than Jamilla or others in the Indian grocery stores.) Apparently there are counterfeit imitations of Jamilla out there, although I’ve never had any issues. Not much choice of colour – if red or auburn doesn’t suit you, henna is not for you. It can be harder to predict the exact shade you will get as it depends on the colour of your hair. (Blondes will get brighter hair, brunettes more auburn and people with darker hair may not see a colour difference at all – many Indians with darker hair use henna as a conditioning treatment rather than dye for this reason.) Henna is permanent, if you dislike the colour, you will have to wait for it to grow out, get a hair cut.
excludedGranola2
I just went from ivory-white hair to using henna for the first time, as I’m done with all the damage and want a process that’s natural and actually good for my hair. I did research on using henna as hair color for a year, I literally read everything on the Internet about the subject so that I’d feel fairly confident about how to go about this transition. To get my hair back to it’s actual color I first filled my hair with a demi permanent in a red-gold to replace the pigment that the bleaching had removed, then colored my hair with a level 8 ash blonde, my end result being a level 6 ash blonde, which is my natural color. I let that fade for about a month then started on the henna.
I knew that I wanted a coppery-orange but not day-glow shade of orange nor auburn, so I mixed henna and cassia obovata with amla, and bhringraj. The ratio is 2 parts henna, 2 parts cassia, 1 part amla, and 1 part bhringraj. This mix imparts a lovely natural but bright newly minted penny shade. I use the amla for it’s ability to lessen the brassy shades that sometimes occur with henna and because it’s an acidic fruit, therfore I don’t need to add lemon juice or vinegar to the mix. I use the bhringraj to, again, tone down the red pigment of the henna, and because it’s purported to help with hair fall/loss. Which I desperately need from dealing with thinning hair due to issues with PCOS.
After mixing the plant powders I add room temperature chamomile hibiscus tea and rosewater, enough to make a paste with a greek yogurt consistency. I mix it until there are no more lumps, then cover it with saran wrap and let it sit somewhere warm for 8 hours. I apply it using a hair dye brush as its the cleanest method I’ve found for applying henna. Afterwards I wrap my head in saran wrap and leave it in my hair at least 3 hours, but no more than 6.
So far I have used this twice, and I’ve been blown away by the color and the condition of my hair. It is softer, fuller, bouncier and has a sheen to it that my hair hasn’t had in years. I experience a significant reduction in hair fall, plus my hair has grown 3 inches in 2 months. My hair normally grows an inch in that same time. Overall I’m thrilled with this discovery and plan on using this forever. If you’re interested in henna, all I can say is, why the hell not? It’s healthy for your hair and with the right mix and a bit of research you can achieve any color except light blonde. Just make sure that you buy Body Art Quality henna that comes in foil pouches. And don’t buy pre-mixed hennas, you don’t know what’s in them or if the henna has lost potency. I really enjoy coming up with the formula and mixing it up. There’s something primordial and witchy about preparing the henna.
pitifulCaviar3
I’ve been dyeing my hair with henna for at least 10 years. I’m not an expert, but I wanted to share what has worked best for me.
(HENNA isn’t for everyone. It’s unforgiving and if you have any hair that’s lighter than medium brown, a strand test or two is something you should absolutely do)
I have dark brown hair that’s about 20% grey. I’ve really enjoyed the effects of henna over the years. I prefer it to traditional chemical dyes simply because it leaves the hair in much, much better condition. No lifting of the cuticle, no developing, no neutralizing. My hair is somewhat coarse and dry, and it just can’t tolerate traditional dyes. Henna always covers my greys, lightly to start but with a deeper red after each application, which for me is 4-6 weeks for new growth.
COLORS: The henna dye molecule comes out orange/red. On lighter hair, you will want to strand test first. On medium brown to darker hair, the results will be much more subtle. On gray hair you can expect the same results as with on light brown up to blonde hair. However, with several applications of henna, grey hair can become quite a deep red which is better than grey, IMO. This also applies to light brown up to blonde hair; the more pure henna you use, the deeper the color becomes.
BRANDS: I’ve used many, Mehandi, Henna for Hair, Hennasooq, Lush, Rainbow, Calvin Schon, etc. I think the most important things to consider when selecting a brand is country of origin and purity grades. The best henna I’ve used has come in a foil package, not a tub or jug or jar. I’ve always been happy with Henna for Hair and the brands they supply, which I believe are from Pakistan. I recommend avoiding Lush, because their bricks are mixed with cocoa butter which is counter-productive to the dye process, and Rainbow because their henna just sucks. Defintely look at reviews and before and afters.
PROCESS: You can find every possible process recommended online. What works for one won’t work for another, and that includes what I do. Some learning and experimentation is necessary. What I do is something I’ve simplified and practiced with over the years. I take my henna and put it in a large Pyrex measuring cup. I add about a splash of vinegar. Equal to maybe about 1/3 cup. Then I slowly add tepid water and mix until it’s the consistency I want. Using boiling water or coffee/tea will make dye release happen much faster, but it will also make dye demise happen much faster, and the timing of it all become precarious. When using room temperature water/coffee/tea, you have more time to prepare and less guesswork. Unluess you’re in a super hurry, I recommend using tepid liquid. As far as adding an acid like vinegar or lemon juice or citric acid, that depends on you. I’ve found better results from using an acid. I use a 20% vinegar/80% water rinse on my hair each time after I wash/condition and it’s game changing for me, so adding some to my henna is no problem for me. There’s also evidence that adding an acid improves the efficacy of henna.
With regard to consistency, that all depends on you. I prefer mine a bit more watery than yogurty, because I want it to seep between every hair and around my scalp. It’s helpful when going for grey coverage. However, a general rule of thumb is that you want it at a yougrt consistency.
I let it sit on the counter until it has achieved a good dye release. The time it takes to dye release can vary wildly. I just check it every 20 minutes by placing a dot on my palm and letting it sit for a minute. When I wash it away I’m looking for a nice coppery red stain to be left behind. When that happens, I’m ready to apply.
I have mastered the art of applying for root/grey coverage (humblebrag). I spread a towel in front of my large full length mirror. I set down my pot of henna, my rat tail comb and shower cap on the towel. I start on one side of my head, right above the ear, and part my hair from front to back. I apply with gloved fingers or a thick, small paint brush. All along the part line from front to back. (The paintbrush only works with more watery mixtures). The I make another part, just maybe an eighth of an inch above the other, and do it again. I repeat until my entire head is treated. Slap on shower cap, peel off the gloves and start clean up. I leave it on for about 3 hours.
You can also freeze your henna mix right after mixing it. When you thaw it out, it’ll be ready to use.
REMOVAL: The best, by far, is to remove with CONDITIONER, not shampoo. Get in the shower and rinse it out as best you can. Then dump conditioner on and gently massage until it’s frothy. Rinse. Then dump more conditioner on again, scrubbing and massaging your hair and scalp. Rinse. Keep going with this until it’s all rinsed away.
I don’t wash my hair for 3 days after applying henna.
I love it. I’m so glad it’s an option since my hair doesn’t respond well to traditional dyes.
mercifulTruffle0
I’m reviewing the organic red raj from henna sooq. I used it on my medium brown highlighted hair and got a burnt orange-ish color at first. Did a few more applications using different mix ins to get more red-red & not orange. I ended up with a very pretty Ruby red that I liked for about a week… I’m sorry I know it’s natural and has been used as a hair dye for 1000s of years but I thought it looked so bizarre on me. It looked horrible against my skin tone and no matter how dark my hair was inside it still glowed a bizarre shade of orange I have never seen in my life, when I went outside. I’ve spent the past two, almost 3 years growing it out & I have about an inch left. It did not damage my hair, but it was messy, bled out of my hair for several shampoos after I did an application & smells revolting like spinach and dirt…. well I guess it is dirt but whatever. Proceed with caution!!!! I honestly would rather have my plain Brown (going gray) hair than deal with that ever again. Lesson learned
dreadfulGelding1
Henna saved my bleached hair like nothing else did. My hair was splitting midshift, not simply on the ends, and was a parched mess. I decided to gloss my hair with a mix of henna and cassia, adding in a bit more henna as I dared to push the color redder. The condition was beyond anything I dreamed afterward.
Here’s the thing though: if you try to just play with henna for conditioning and maybe a bit of color, and you have lighter hair (worse on bleached), it takes you STRAIGHT BACK to that brassy orange look that we buy jugs of purple shampoo in the hopes of avoiding. The only way to get a nicer color is: add more layers of henna to make the color into a deeper red-red, or add indigo, which will mix with the henna to make a brown but leave your hair UNABLE TO BE COLORED with any product that lifts, unless you want your hair to go green.
Me? I’d already been a henna head many, many years ago. The built-up color was a gorgeous auburn, but getting my new growth to match the intensity of the many layers of henna on my hair was a commitment and hassle I just could not live with. I decided that more layers of henna were a definite no-go, or I’d just end up where I was before.
I had some success fading the henna out with many, multi-hour (8+) soaks in hot oil (coconut + olive) treatments. I got it to a color that I could better live with, went over it with a demi dye in chocolate brown, and I’ve been relatively happy since. The shine and condition remains in my hair, as well as the red tones that may have gotten less intense, but won’t ever budge.
TAKE HOME LESSONS
– Henna goes from gold –> orange –> red, and the early stages appear as full-on, bleach disaster, brassy tones, on light or bleached hair. Not cute, and the only way forward is more layers, which means more upkeep on new growth. Do your research on what you’ll actually have to do to maintain some harmony between your new growth and henna’d length.. it may not be an acceptable amount of effort for you, or it might. Some very unfortunate women have found that no matter how many layers of henna they do, the color stubbornly refuses to go past the orange stage.
– Other options for getting a nicer color involve adding other herbs (like indigo, which means you can never use a permanent color or bleach until it grows out) or using a deposit only/extremely low lift (demi) dye.
– Oiling minimally removes color. It works best on indigo, and only slightly on henna. For me it made the color less intense/more translucent (fading) than actually washing it out. Red tones in general tend to linger in hair until they’re bleached out, but the same goes double or triple with henna. They are there to STAY.
Do your research, strand test, and very carefully weigh your ability to commit as you go. If you get to a point where you even passingly google ”how to remove henna”, don’t put any more in your hair! Try to fade it, dye over it, and grow it out, and use cassia only for conditioning. I hope this has been helpful to someone
amusedDinosaur5
I have had reactions to conventional dyes before, whether applied by a professional or my self. So I went without for longest time. But I have dark brown/black hair with a lot of silvers peaking through.
I’ve tried to embrace the grey, but I’m not ready. Enter Henna.
Well after a lot of research, asking friends who use it, emailing companies that sell it, I decided on to take the plunge summer of 2014. Well I never looked back. BUT it is a commitment. Once you henna you can’t go back (but my friend just kissed her teeth and used a box dye once and it didn’t make her hair fall out…just saying).
Find a reputable company that sells it. Body Art Quality only as trying to rinse twigs out of curly hair is just tedious.
Work out a mix that will work for YOUR hair.
So I knew from the start I am not putting anything with a Ph lower that a 4, on my hair for more than a few seconds. Just no. So that left out the lemon juice and cider vinegar mixes.
My hair is coarse, dry and putting henna on dry hair I thought it would contribute to drying out even more.
So this is what I do…
Mix powder with boiling hot filtered water in a glass bowl with a plastic spoon. Take time making sure no lumps and is smooth smooth smooth. A yoghurt consistency, I cover the top with cling film then place somewhere warm to prove. Can use it when it cools down as the dye has released from the hot water but Ive found it best leaving over night (or longer as the mood for applying has passed, so I’ll put in the fridge and wait till the feeling rises again!)
Next day I will put the bowl in another bowl of hot water to heat through.
I will then lightly clarify my hair, and squeeze excess water out with a towel.
Mix a Tbs of oil in my henna mix. Hemp last time but will use any enriching oil to hand. A couple of drops of essential oil might help with the smell of very green grassy herby wet dog smell.
In a plastic piping bag I have placed in a tall beaker for ease, I will spoon the mixture in. Twist off the top.
IMPORTANT: I will prep hair by sectioning it off for ease of application.
Put lip balm/baby bum cream/barrier oil around forehead ears back of neck.
Make sure as much stuff in bathroom is moved away. Have dark cleaning clothes to hand.
Wear proper gloves, those thin latex gloves are great.
Have a plastic bag or treatment cap thing to hand to cover your head afterwards.IMPORTANT
Using filled piping bag (you’ve cut off the end to get the stuuf out. You could use the corner of a plastic freezer bag instead) follow the sections of hair. Squeeze the henna through your hair with your free hand. Easier is someone does this for you but we are warriors.
Pile hair up on head when you’ve put it all on. Rinse your gloved hands as much as you can, then put plastic cap on. Could add cling film to this as this stuff may drip…
Now clean up…
I add a scarf to this then go about my business for 3 to 6 hrs.
USING GLOVES Rinse. Rinse. Rinse. Then rinse some more. If your not adding indigo after, use a cheap thin conditioner to help the rinsing process. When water runs clear. I will use a dark old towel to wrap my hair whilst I clean up AGAIN.
If I haven’t lost the will to live then I will put a moisturising treatment on my hair with heat for 20mins. But usually I can’t face this, so will add a little oil to damp hair and loosely style it for tge next day. In a couple of days I will do a deep treatment.
Then I have deep red hairs instead of silvers, my dark hair is shiny and my hair as a whole is stronger and denser. Until my roots become intolerable, approximately 6-8wks. Then I do it again…. I tend to make double the amount of henna the first time around then put the extra in freezer to make the process a little easier. But its just a step less. Bleh.
Thats why only 4 stars cause it is hard work. But I am happy with the results. When I do it.
scornfulOil2
Not a review as such, just some advice from a regular henna (and indigo) user. I am naturally dark-haired, approx. 25% grey and I’d finally decided to ditch the boxed hair dye. Having to do my roots every few weeks was proving too much for my poor hair after a 16-year habit. My advice is to start off mixing henna with just warm water and a little lemon or lime juice to help with the dye release (not too much as it is drying) and once it’s ready to use add an egg. The egg makes it much easier to apply and is conditioning. There are loads of you tube videos on how to mix and apply it and how to get different shades of brown to pure black with indigo (you’ll need salt to fix the colour) and amla. The biggest drawback is it is quite messy though less so if you are well prepared (newspaper on the floor, crappy towels, plastic gloves, clingfilm to cover hair and damp cloths to clean up splashes on face and sink/bath immediately). The best thing about it is it is completely natural, leaves your hair in fab condition and works with your hair tones. The colour is never flat. And I can alternate with Adore Plus, a very gentle semi-permanent (no peroxide or ammonia) if I want more of a fashion tone and it seems to grab onto the henna’d hair just that bit better. Do your research and take the plunge.
somberLard4
Somehow I didn’t see this area of reviews for henna, so I had made my own for the henna I used. You can find the full review for it here:
Ill also post a part of my review here, in case you don’t want to go to the link above:
I went to my local Indian grocery store and picked this up. It comes in (1 kg) green plastic packaging. Thats alot of henna powder for just $10.00! The brand is “Quality Brand”, at least thats what it says on the package. I went home and was really in a hurry to get it on my hair hoping it would reverse some of the damage done by the other henna I used. I looked up so many videos and read many articles about how to make a henna paste, but in the end I went with something simple. I have shoulder length hair so I used 120g (100g is usually what’s recommended for my hair length). Actually, I’ll just write my recipe here to make it easier to use:
– 120g henna powder
– 1 cup coconut milk ***HIGHLY RECOMMEND: This will moisturise your hair without the use of oil***
– About half a lemon (freshly squeezed is best)
– About 1/4 cup tea (regular tea) *I put 4 tea bags in a cup and let it seep for a few minutes*
– Water as needed
It may seem like the biggest hassle in the world, and time consuming, but I promise you its worth it. I’ve only done this treatment once, yet my hair doesn’t fall out any more (rarely), and my hair is stronger and shinier. I will be doing this treatment either biweekly or once a month. Now go get some henna!
I used this video to learn how to properly apply the henna:
For a more detailed review, check out the link I provided at the top :).
PS. I just checked out some of the sites that people use to order henna online, and I honestly think they over charge people for no reason. You can find 100% pure henna at your local Indian grocery store for much less. Juts be careful which brand (look for ingredients, information, etc). Don’t buy a bag that has no labels/information, and you should be fine.
empathicMoth9
I started using henna powder in 2008, when the dry, desert air was destroying my long hair in a way that conditioner couldn’t halt. My grey hairs were getting the worst of it, turning into unruly wires that stuck out every which way. The henna not only turned my brown+grey hair into a luscious auburn; it transformed it into glossy waves. I actually had a friend tell me that, upon meeting a stylist who had done my hair once for a concert, the stylist referred to me as “the girl with the gorgeous hair”. Which shouldn’t, under ordinary circumstances, be enough to identify a person but suggests just how hard the environment is on everyone’s hair in these parts. Without henna, I’d be just another inverted broom straw in a crowd, I guess. 🙂
That being said, henna makes hair red. Permanently. I have to do my roots once a month, pulling it back into a ponytail to camouflage the new growth towards the very end of the month. And I do wait the whole month because application is a messy and time-consuming process. Here’s what I do:
1) Add water to pure, BAQ (body art quality) henna powder. Mix until somewhere between the thickness of mashed potatoes and yogurt. The thicker it is, the easier to keep it on your head for hours. Let the mixed henna sit in a warmish place for at least an hour. I mix it in a plastic yogurt tub as I read somewhere that it reacts with metal.
2) Apply thickly to grown-in roots. I apply it like icing with a hair color brush or gloved fingers, so that the hair is completely coated and concealed. The thicker the paste, the more intense the color, I find. I always wear gloves for the whole application because quality henna on the skin, even for as little as a minute, will stain it orange. I wear clothes that I don’t care about in case they get henna on as it can stain orange.
3) Pile and clip on top of my head. Smear any henna remaining in the yogurt tub on the surface of the piled hair. Cover with a disposable shower cap.
4) Leave on for 4 hours. Yes, 4 hours. I don’t make any plans to go anywhere because it will drip down my face and neck occasionally.
5) Rinse thoroughly. I get a bottle of cheap conditioner and just glob it on my hair once I’ve mostly rinsed it out. The conditioner just helps to rinse the last bits of henna out. Henna can be hard to get out, especially at the scalp, so I really apply tons of conditioner, about 1 cup, combing it through before the final rinse. Rinsing takes a long time for me, at least 20 minutes, probably because my hair is very thick and long.
6) Don’t wash it for a couple of days. I find that my normally quick to become greasy hair doesn’t even begin to feel greasy until about day 3 after henna application so I don’t have any problem not washing it for that long time.
No joke, this is a huge hair commitment, if you have hair of any considerable length. But I absolutely love my hennaed hair. As does the husband, which is also a motivator. 😉
ecstaticLard8
Edit- not to be a meanie jeanie mcqueenie etc., but any negative review saying OMGARsH it’s PERMANENT?! or OMG it’s RED?! srsly needs to…give those 1 stars to their poor research NOT the henna. A simple google search reveals all: tis permanent, don’t do if not committed to the resulting colour, strand test! Shakin my head…as my henna’d hair boings around silkily, scattering flecks of red shimmering gleaming goodness in the light..
—
I have used henna off and on for years. Actually everyone has already posted useful information. I wanted to say that if you have dark hair with natural or bleached highlights, henna is the perfect way to bring them out and add shine. You can do a henna ‘gloss’ which is milder, and that way it won’t be such a BRIGHT or obvious red tinge, but you will get the benefits. Shine, strength, volume. My hair has a beautiful deep golden-auburn look, now, and all the highlights have softened so the roots don’t look so stark and ugly!! I cut out the box hair dyes, and this is my recipe (for my own reference really)–for shoulder length dark hair–
>>yogurt (1 cup) or Coconut milk (canned)
>>henna (1/2 cup)
>>1/2 lemon squeezed, or less
>>hot water, coffee
(let dye release for 7 hours)
>>add 1 tspn coconut oil, 1 tspn olive oil, 1 tspn glycerin, 1 egg yolk
(some ppl add 10+ egg yolks for very long thick hair!)
—
Leave in for about 2 hours n 30 min
—
Bam! Not too red. Use a deep conditioning mask after washing out henna.
—